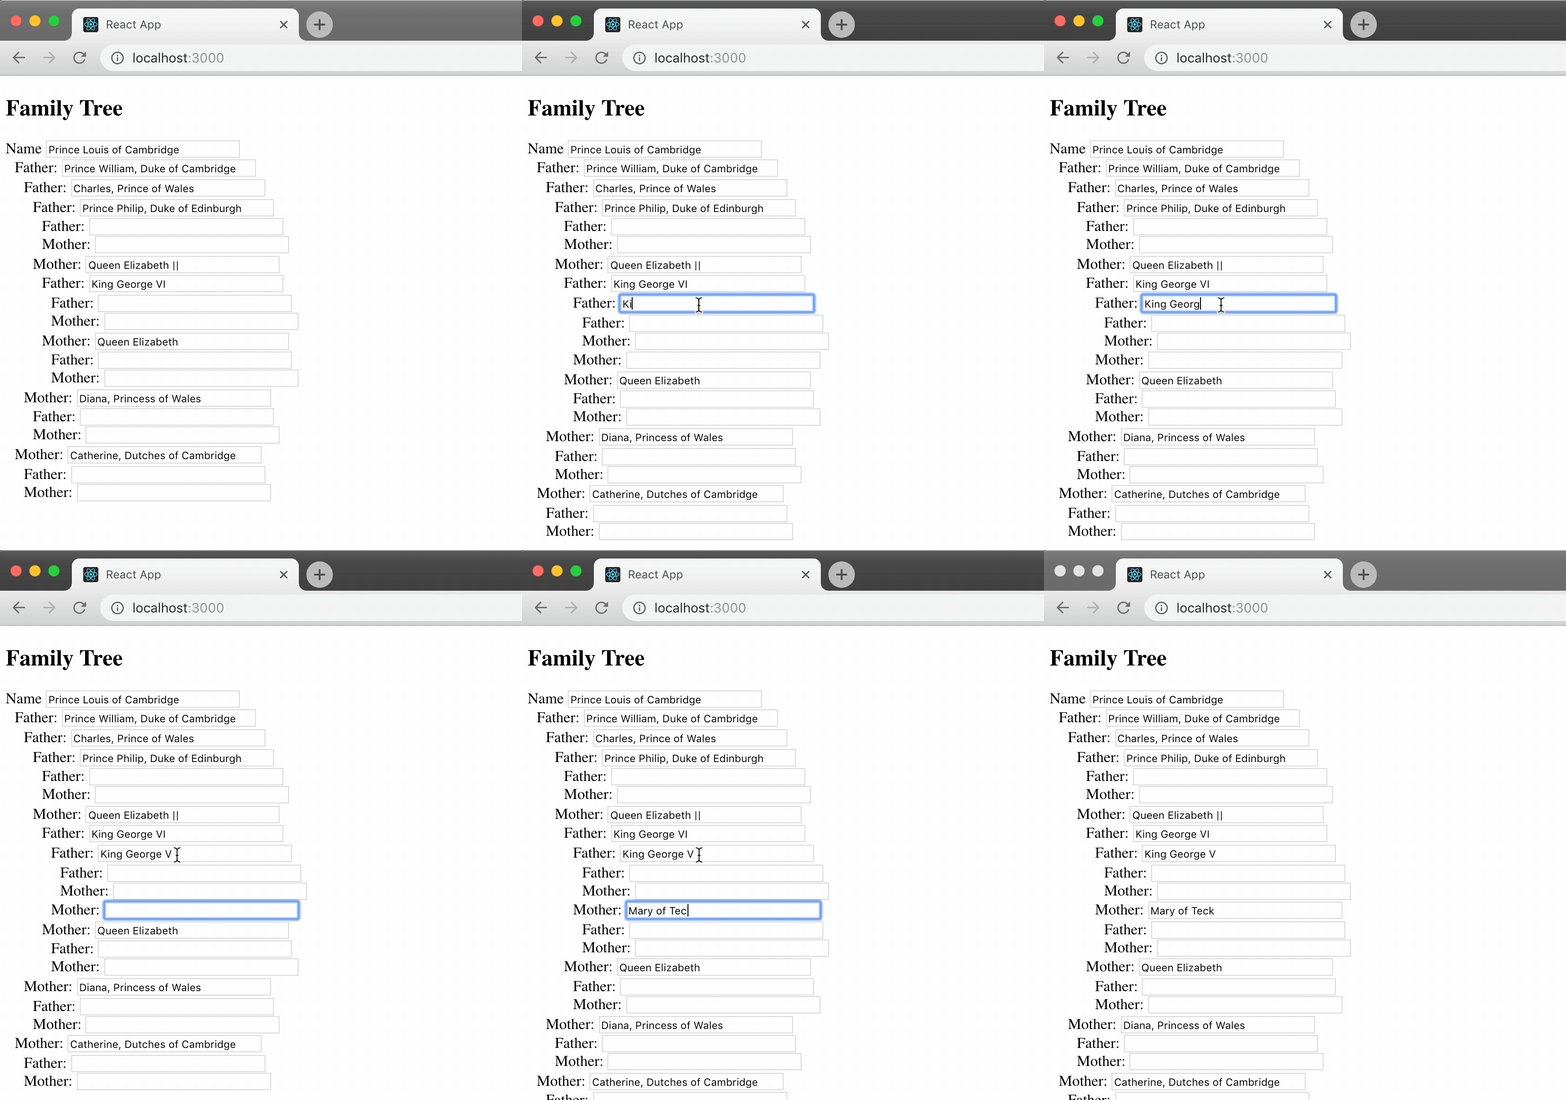
In this tutorial, we will create a Family Tree marker component using React Hooks and Microstates. The Family Tree maker will allow the user to enter their name, then their parent’s names, their parent’s parent’s names and their parent’s parent’s parent’s names, as far back as they can remember.
To do this, we’ll follow the following steps:
- Create a new project and install Microstates
- Build recursive Family Tree maker component
- Persist component state in LocalStorage
- Optimize re-rendering of our component
Let’s get started.
Create a new project and install Microstates
Let’s create a new app using create-react-app. If you don’t have create-react-app installed, you can install it by following instructions on create-react-app website.
create-react-app family-tree-app
cd family-tree-app # go into created directory
Then add @microstates/react & microstates to your project.
npm install --save microstates @microstates/reactYou should be able to start the server using npm start and see the React logo when you go to http://localhost:3000/.
Build recursive Family Tree builder component

Our component will allow the user to enter their name. When the name is entered, they’ll see an input field to enter names of their mother and father. When a parent’s name is entered, we’ll show input fields for parent’s parents. This will work recursively as deeply as the user has patience to enter.
State management is usually the most difficult part of building this kind of component. Luckily, Microstates will make this very easy. All we need to do is create a type that will allow us to store a name for a person, a mother and a father with their names. It needs to be recursive, just like our component. Microstates makes it very easy.
class Person {
  name = String; // name of the person
  mother = Person; // mother is of type Person
  father = Person; // father is of type Person
}
Our type is complete. This is everything that we need to create a recursive data structure. Microstates will take care of proving us with transitions and handle the immutability of this recursive data structure. Now, we just need to write the component that will use our Person type and useType hook. Let’s begin by creating the state and passing it to our future FamilyTree component.
import useType from '@microstates/react';

function App() {
  let person = useType(Person);
  return <FamilyTree person={person} />;
}
We need to actually write our FamilyTree component. The component is going to show an input field for the name. When the name is not empty the component will render a FamilyTree component for the mother and the father.
function FamilyTree({ person )} {
	return (
		<>
        <input
          value={person.name.state}
          onChange={e => person.name.set(e.target.value)}
        />
        {person.name.state !== "" && (
			<>
				Father: <FamilyTree person={person.father} />
				<br>
				Mother: <FamilyTree person={person.mother} />
			</>
        )}
      </>
	)
}
That should do it. Look at the onChange handler of the input. Notice the person.name.set() transition. It’s similar to a reducer that changes the name of the node, but Microstates handles immutably updating the value and causing our component to update via our useType hook. Let’s use another hook to persist our input in LocalStorage.
Persist component state in localStorage
Every transition creates a new value that we can serialize and later use to restore the state. We can use this to persist the state in LocalStorage. When the user refreshes their page, the family tree will be restored from LocalStorage. To do this, we’ll need to change a few things.
- Restore state from localStorage
- Create the microstate with restored state
- Persist the state in localStorage
Restore state from localStorage
When the component is being rendered, we need to grab a key from localStorage and parse it with JSON.parse. This part is not unique to React Hooks or Microstates.
const initial = JSON.parse(localStorage.getItem("family-tree") || "{}");Notice the string wrapping an object ”{}" That’s an empty object that was serialized. I’m using this to ensure that there will be a value even when localStorage doesn’t have anything. This will happen on first rendering the component.
Create the microstate with restored state
Once we have the initial state from localStorage, we can pass it to our App component and create the microstate with the passed in value.
const initial = JSON.parse(localStorage.getItem("family-tree") || "{}");

function App({ initial }) {
  let person = useType(Person, initial);

  return <FamilyTree person={person} />;
}

ReactDOM.render(<App initial={initial} />, document.getElementById("root"));
This will allow us to deserialize the value, but what about saving the value into localStorage? We’ll do that next, it’ll require that we use another hook.
Persist the state in localStorage
We want the state of the family tree to be saved in localStorage. To do this, we need to extract serializable state from the microstate. We can use valueOf function to get a value that we can store in localStorage.
import { valueOf } from "microstates";

function App({ initial }) {
  let person = useType(Person, initial);

  let value = valueOf(person);

  return <FamilyTree person={person} />;
}
Once we have the value from the microstate, we can use useEffect hook to queue up the localStorage.setItem operation. useEffect hook is executed after the render is complete, which allows you to perform potentially slow operation without slowing down rendering. It also allows you to prevent unnecessary invocations of this effect by declaring the value as a dependant value. Here is what that looks like,
import React, { useEffect } from "react";
import { valueOf } from "microstates";

function App({ initial }) {
  let person = useType(Person, initial);

  let value = valueOf(person);

  useEffect(
    () => {
      let serialized = JSON.stringify(value);
      localStorage.setItem("family-tree", serialized);
    },
    [value]
  );

  return <FamilyTree person={person} />;
}
In this section, we added the ability to store user’s input in localStorage to allow us to restore their input when the user returns to the page. We used valueOf to extract value from the microstate and useEffect hook to ensure that calling our persist operation does not block rendering. In the last part of this tutorial, we’ll optimize the component to ensure that it doesn’t re-renders parts of the tree where state did not change.
Optimize re-rendering of our component
It’s not unusual for performance improvements to be left until the end of the project, but unusual for performance tweaking to be easy. Fortunately, Microstates was designed in a way that makes optimizing performance with React easy. In this section, I’ll show you how to optimize the component to ensure that only parts that changed actually re-render.
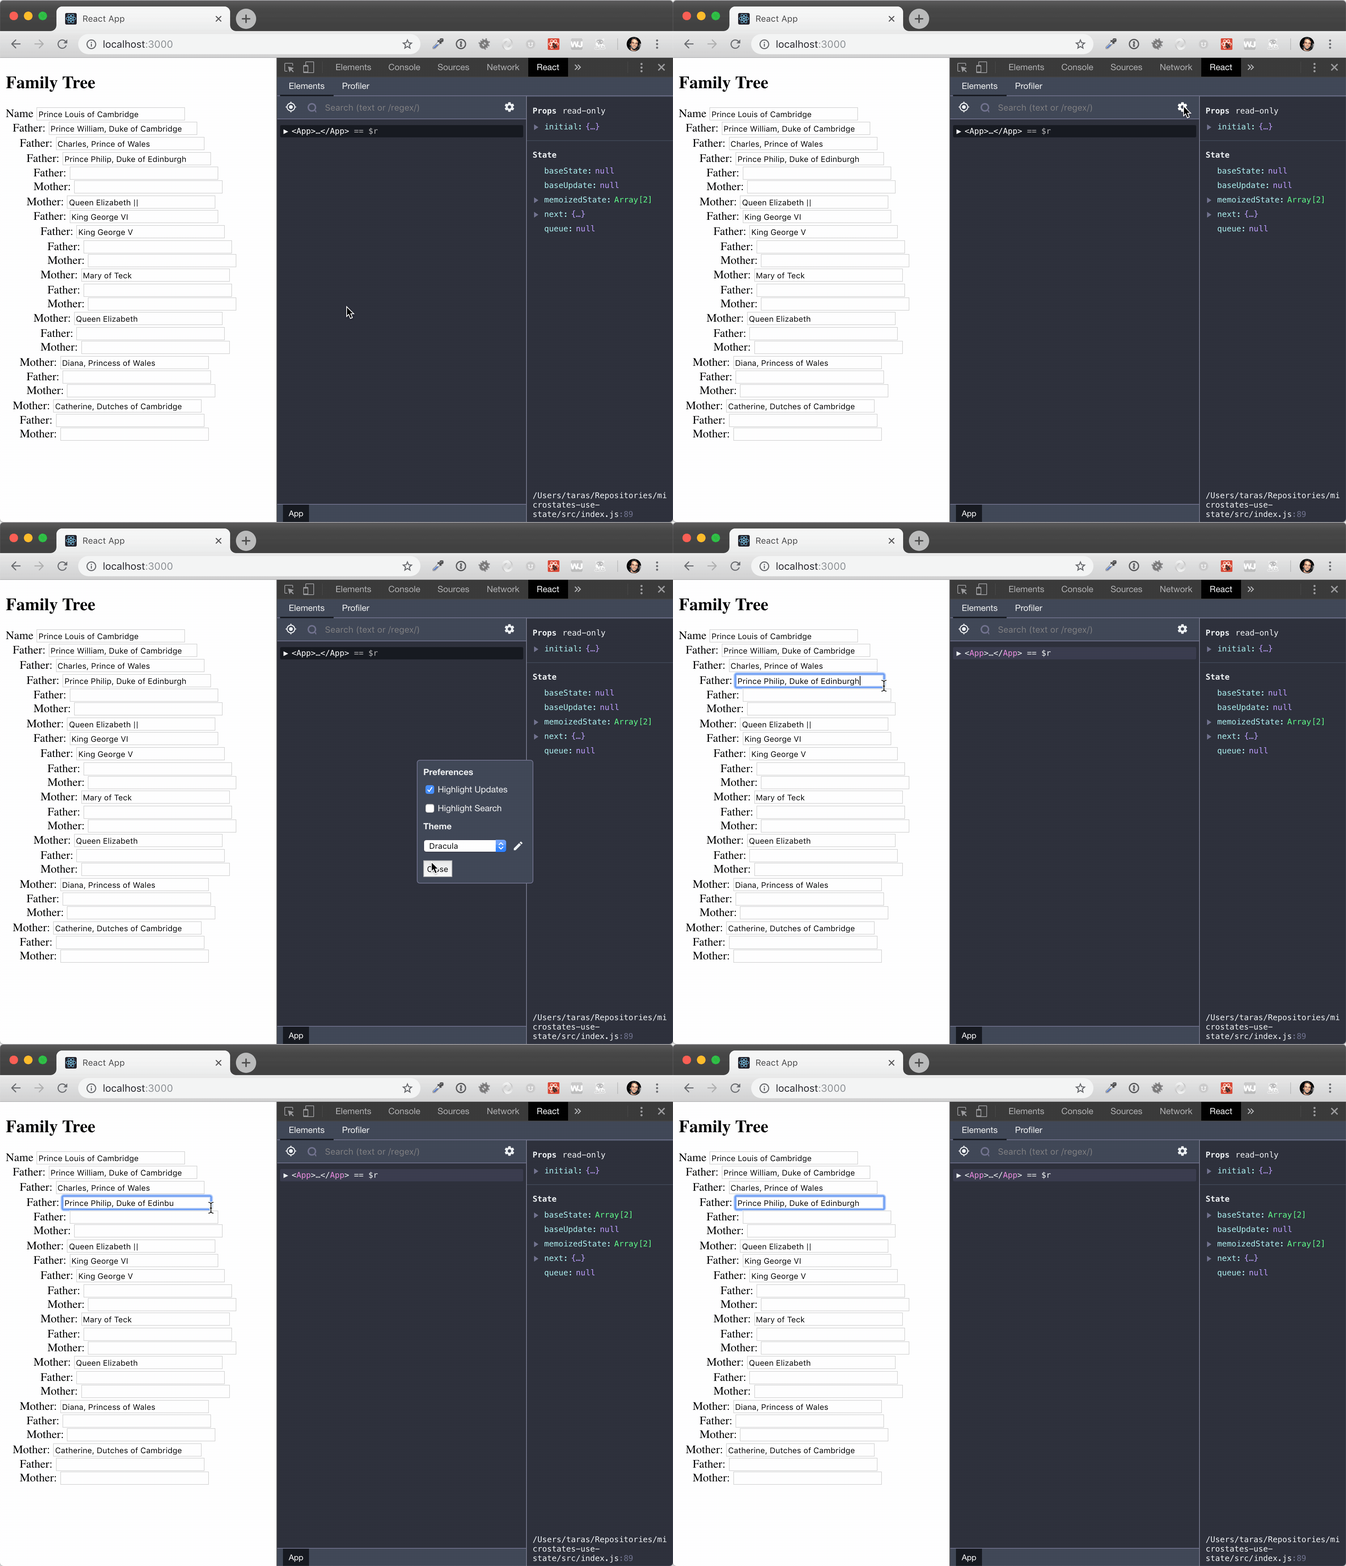
The key to optimizing React rendering is to ensure that only components that changed get re-rendered. React Devtools has a feature called “Highlight Updates” that makes it easy to see which components get re-rendered when you interact with the application.

When “Highlight Updates” is turned on, the DevTools will highlight areas of the component tree that are being updated. If you look at the example above, you can see that every keystroke causes every component to re-render. This is a lot of unnecessary re-renders.
What we need to do is to only re-render children when the state of children has changed. We can use the fact that Microstates are immutable as a guarantee that microstates will only change their references when their value has changed. If they value did not change, then the same microstate will be reused.
We can combine this reference guarantee with the useMemo hook to memoize components based on the microstate that they consume. This will ensure that memoization will be invalidated when the dependant microstate changes. Let’s modify our component to memoize parent’s components based on their microstates.
function FamilyTree({ person }) {
  const father = useMemo(() => <FamilyTree person={person.father} />, [
    person.father
  ]);

  const mother = useMemo(() => <FamilyTree person={person.mother} />, [
    person.mother
  ]);

  return (
    <>
      <input
        value={person.name.state}
        onChange={e => person.name.set(e.target.value)}
      />
      {person.name.state && (
        <ul>
          <li>Father: {father}</li>
          <li>Mother: {mother}</li>
        </ul>
      )}
    </>
  );
}
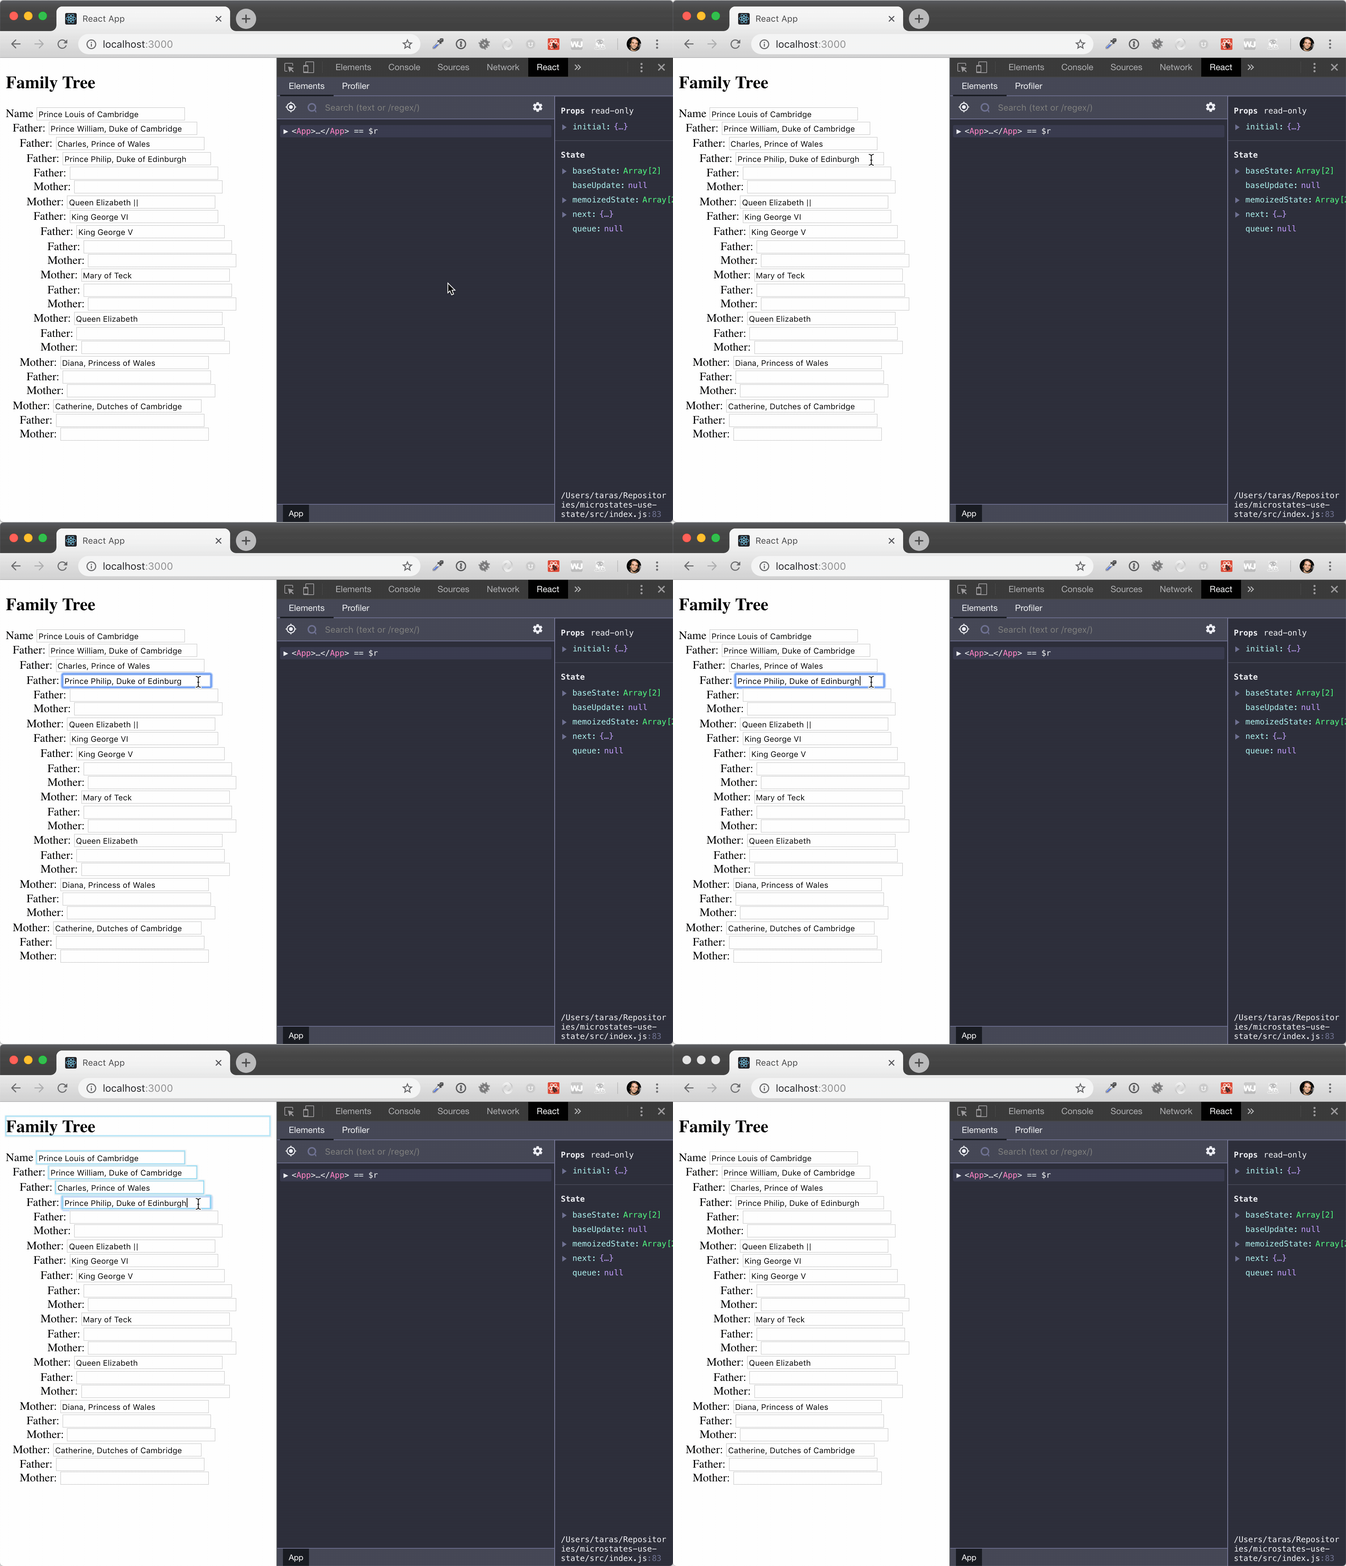
After we make this change, we can check the result and see if we made an improvement. Now when you edit an input field, it’s only changing components above the component that you edited because their microstates were changed.

It’s worth noting that we only change the input in one component but all of the parent components are marked as changing. This is because when a nested microstate changes, the parents of that microstate have to be re-created as per rules of immutability.
Conclusion
In this tutorial, use used useType hoook to create a recursive component using Microstates, stored our state in localStorage and optimize re-rendering of our components.
If you thought that this was easy, then consider how much we were able to do with Microsates and React in 80 lines of code. You can see the final result in GitHub Repo and CodeSandbox.
If you thought this was difficult, please file an issue and describe what you found difficult.
Regardless, tweet me @tarasm and let me know what you think about Microstates and useType hook. If you’re looking for help building large applications, consider hiring Frontside to help you build your app.
